Cherchies Blog

cooking tips

What To Do With Muffin Tins- 25 Amazing Hacks

cooking tipsSheri Spallone22 Comments

What To Do With Muffing Tins- 25 Amazing Hacks

Do you know the muffin pan? Yes, the muffin pan! The one who lives on Bakery Lane? Sorry:) Who knew that aside from baking, the simple muffin pan could be helpful in so many ways, in the kitchen, around the house, in craft projects, etc.? Re-purposing everyday kitchen gadgets, such as muffin pans (aka muffin tins), is an excellent strategy for saving money, saving space, and getting organized; plus, it's just plain fun. Amen! Who's with me?

I had no idea when I started this blog post about the infinite uses of a muffin tin! I knew this was one of my favorite kitchen tools, but now I am 100% convinced it IS my favorite!!! I kept finding more and more uses as I researched. Crazy! Aside from foods (muffins, quiches, appetizers, baked desserts, etc.), muffin pans are so versatile, and you will be blown away when you read this! Are you ready?

Thanks for stopping by:) Comment below if you have used any of these hacks or if you have some to add. Come back again for more family-tested recipes, entertaining ideas, and cooking tips using all our favorite Cherchies® gourmet products.

Follow us on social media: Facebook, Instagram, and Pinterest.

25 Amazing Muffin Tin Hacks

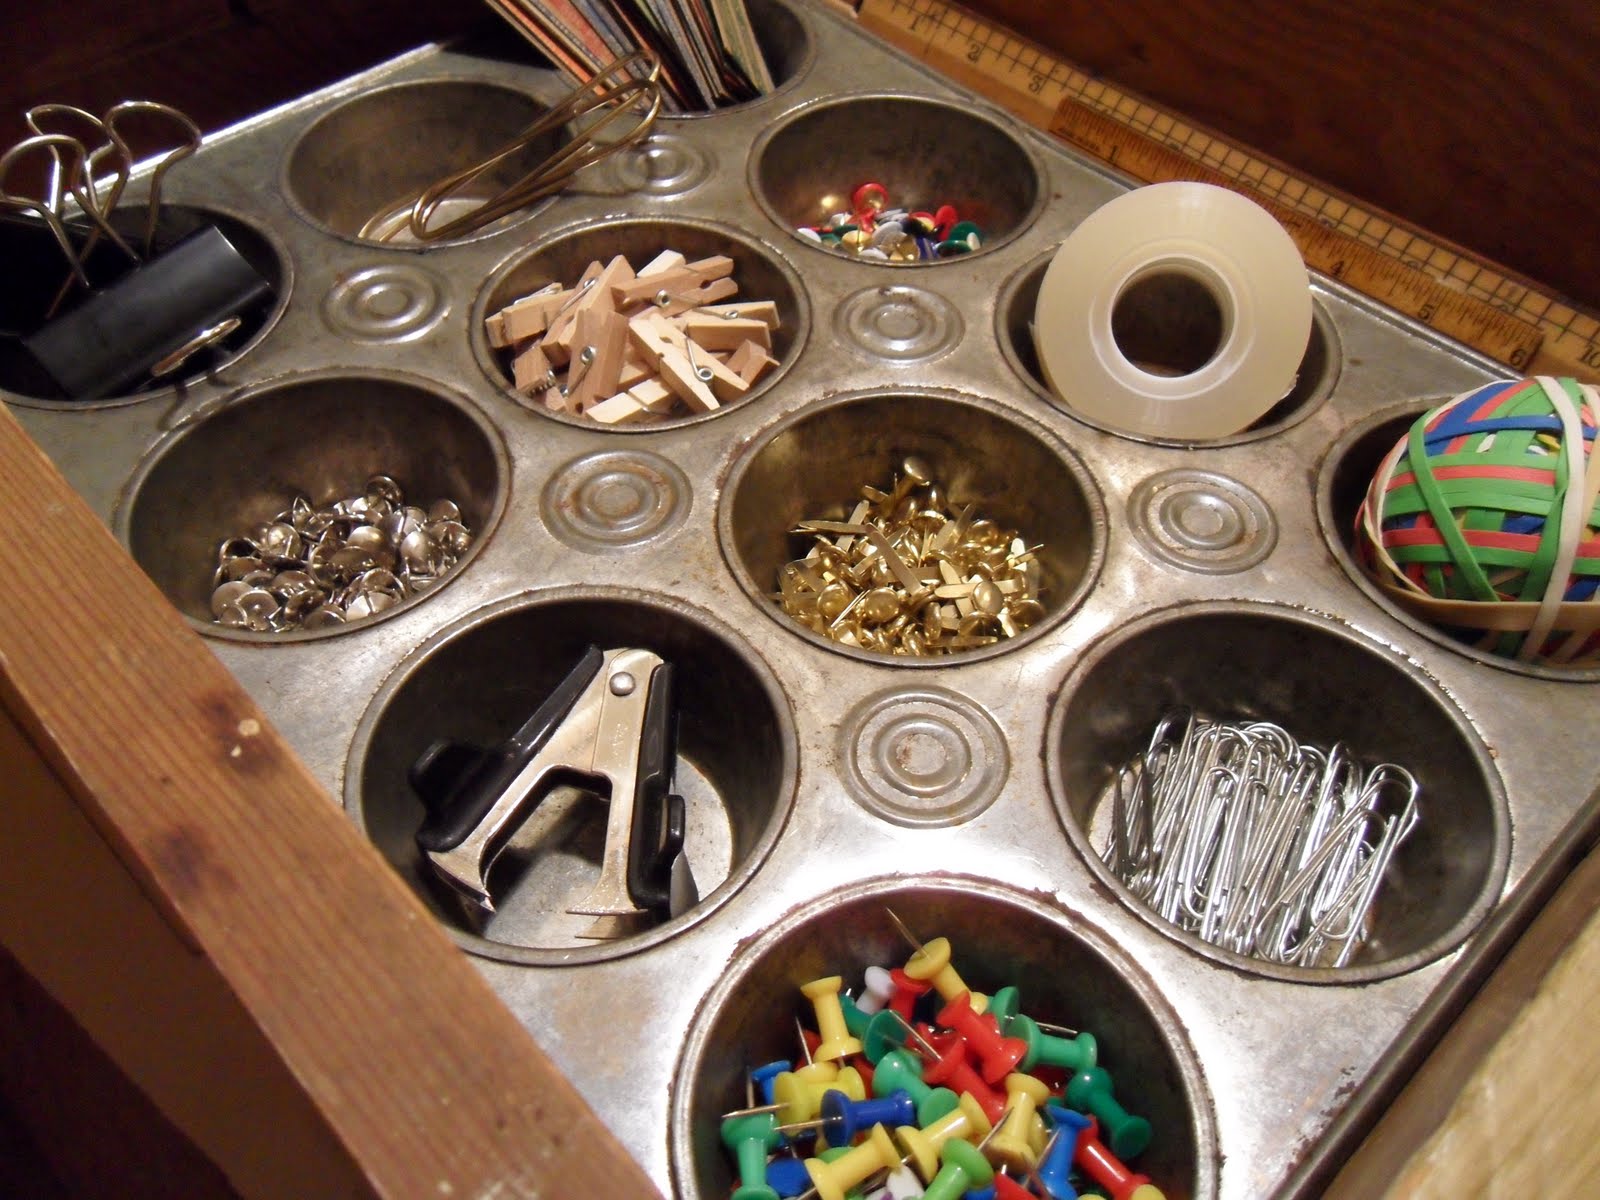
1. Doo dad (what exactly is a doo dad?) and desk organizer - www.homedit.com

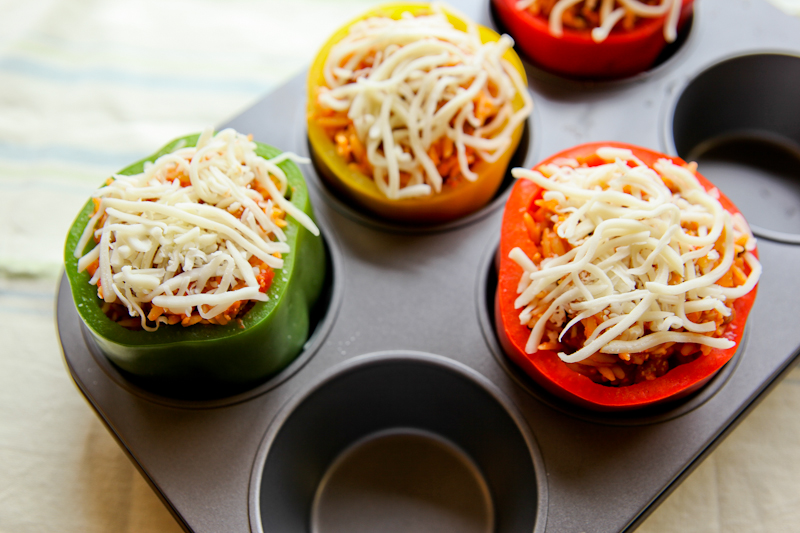
2. The perfect holder for stuffed tomatoes or peppers-  www.betterrecipes.com

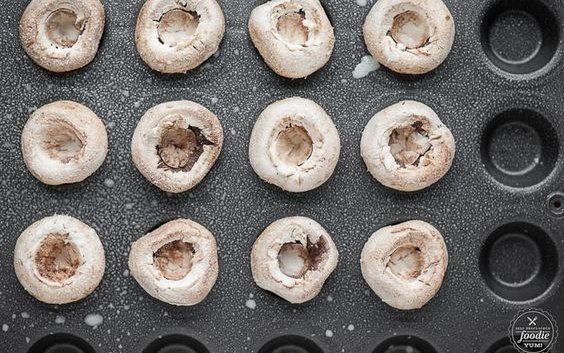
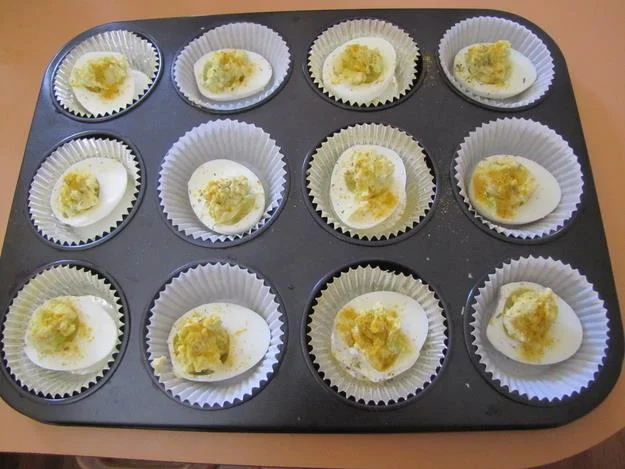
3. Use it to transport stuffed mushrooms or Festive deviled eggs- from www.selfproclaimedfoodie.com and www.justimagine-ddoc

4. Organize ingredients while you cook, otherwise known as "mise en place".   Add a liner and clean up is a breeze.- www.seriouseats.com

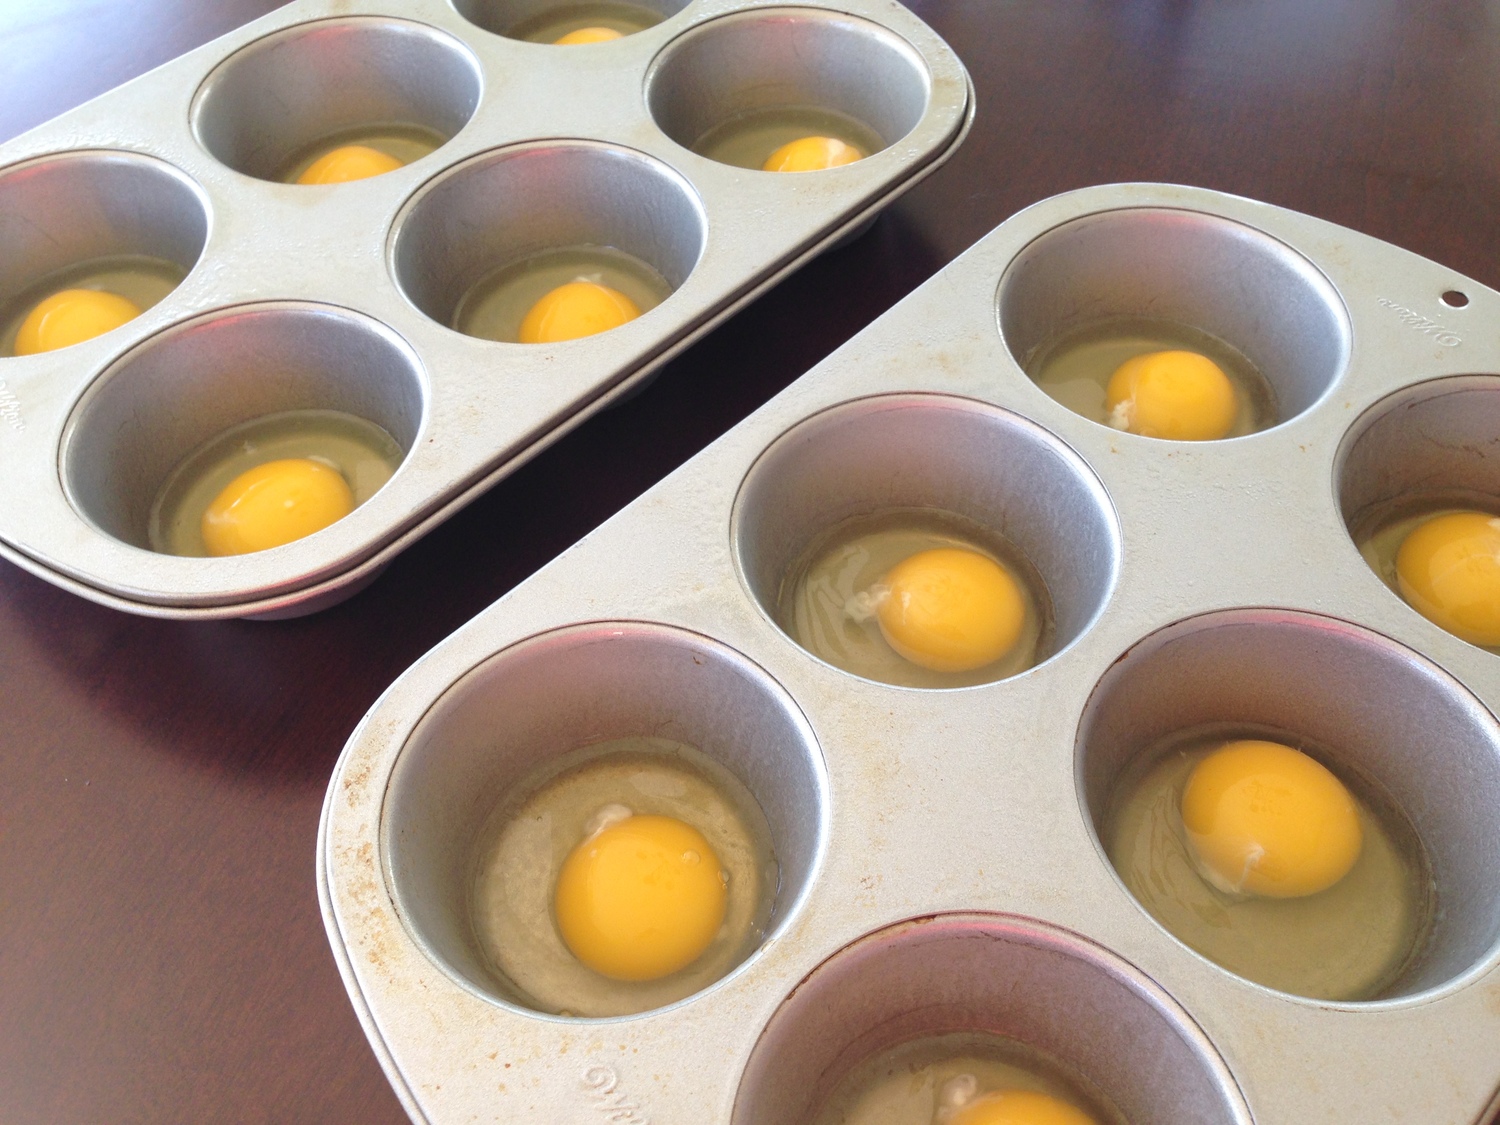
5. Bake eggs in the shell (What??) (www.popsugar.com) or pour into tins to make egg sandwiches.

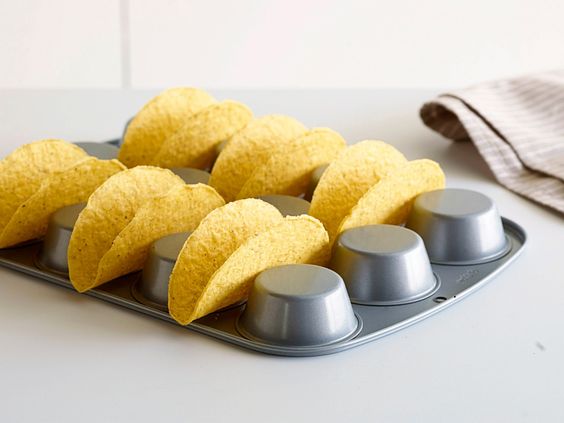
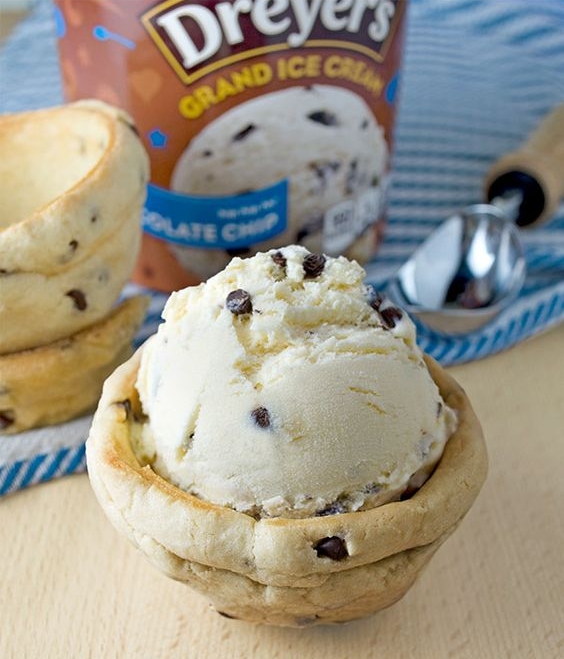
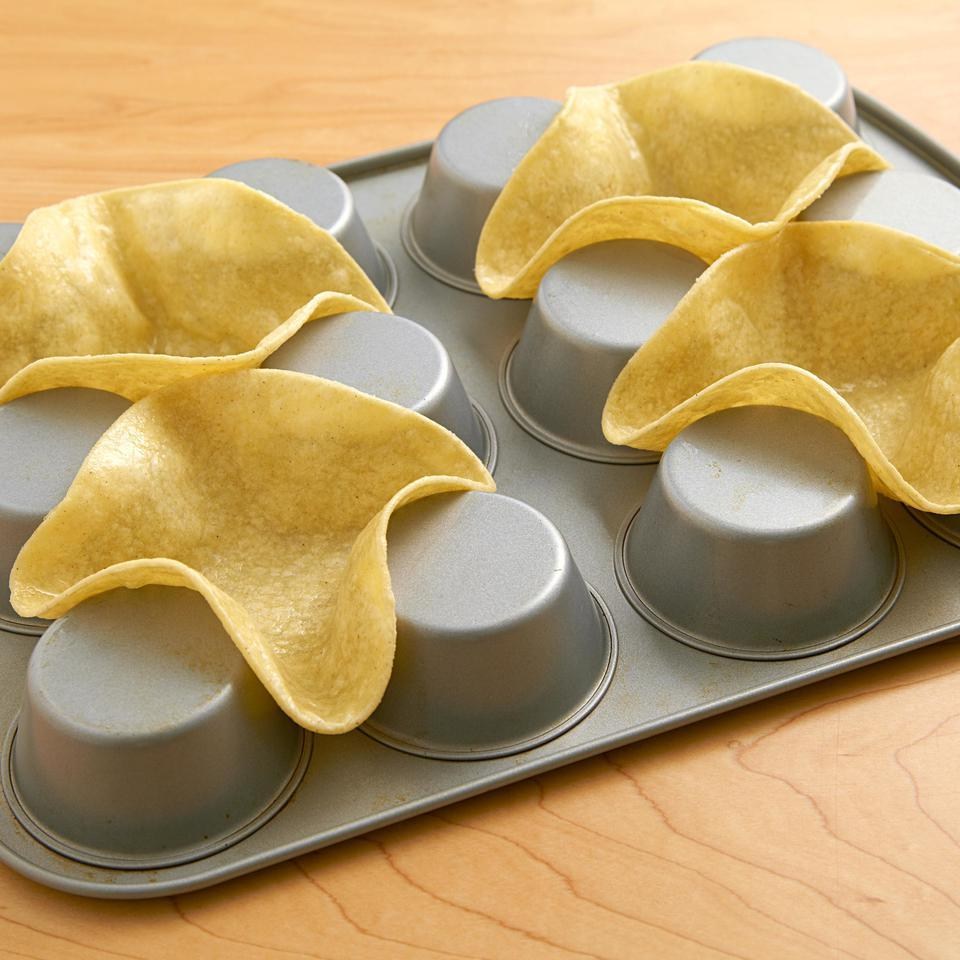
6.  Turn muffin tin over to make cookie bowls, taco bowls, etc. - www.dreyers.com and www.eatingwell.com

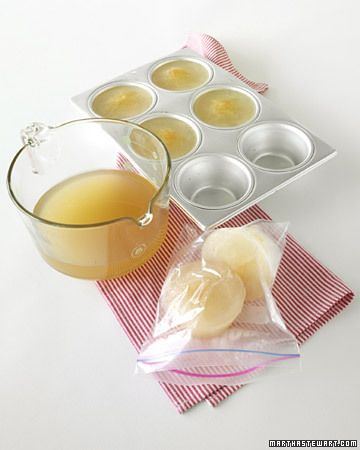
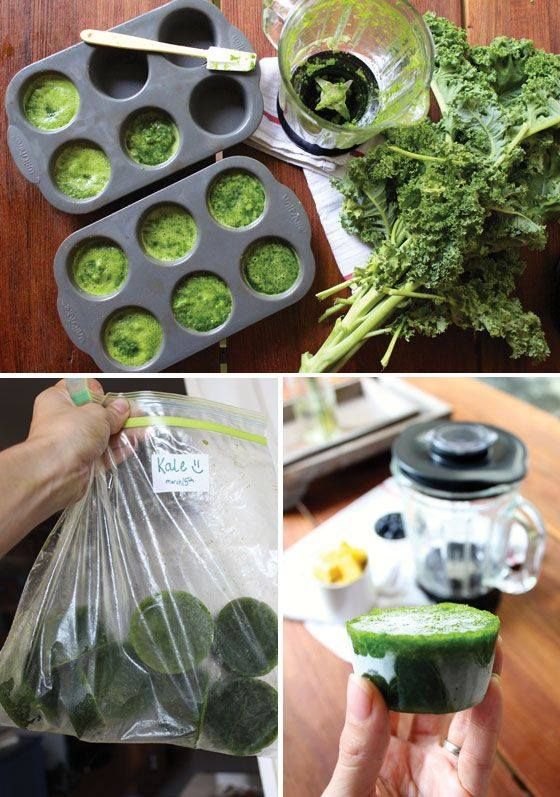
7.  Freeze stock, sauce, or tomato paste and then place in freezer bags for future use- marthastewart.com

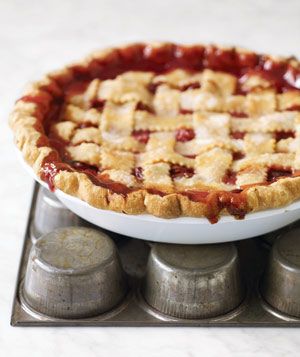
6.  Turn upside down to use as a cooling rack cooling rack- from www.realsimple.com

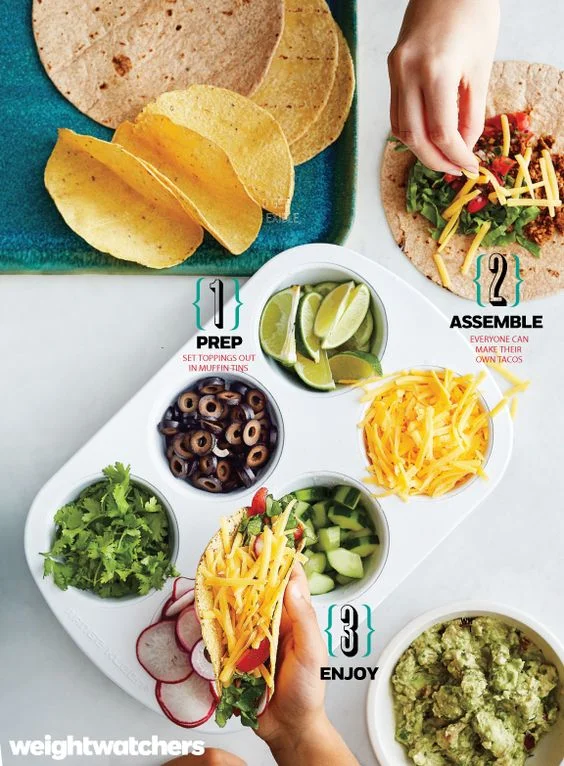
7.  Topping for taco or potato bar- www.weightwatchers.com

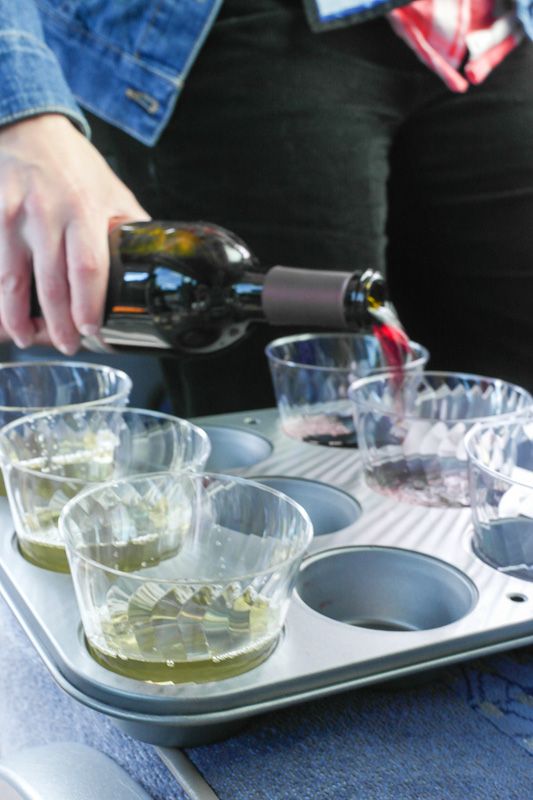
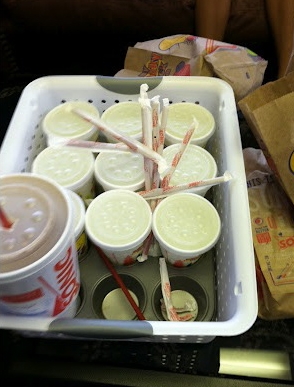
8.   A portable carrier for drinks -www.somedayilllearn.com

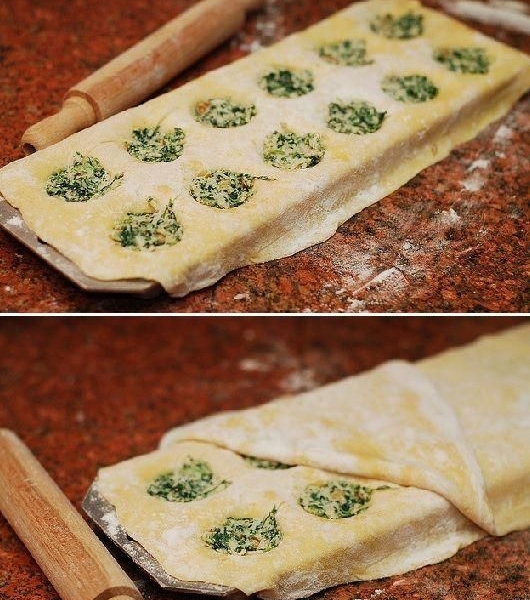
9.  Ravioli Maker??? (ok, mind blown.  I know this person used a ravioli mold, but you could easily use mini muffin tins) - www.juliasalbum.com

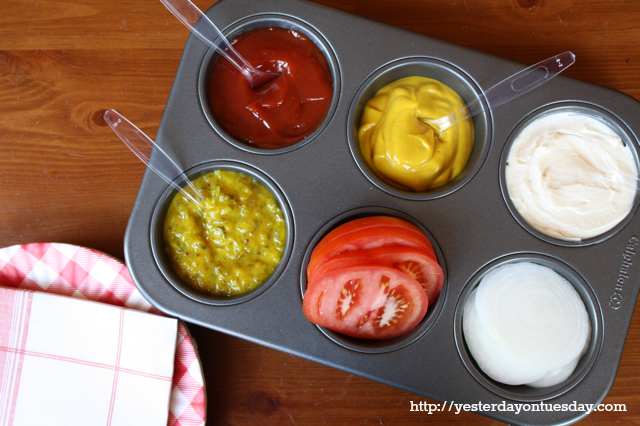
10.   Condiment holder for burgers, hot dogs, and sandwiches - www.yesterdayontoday.com

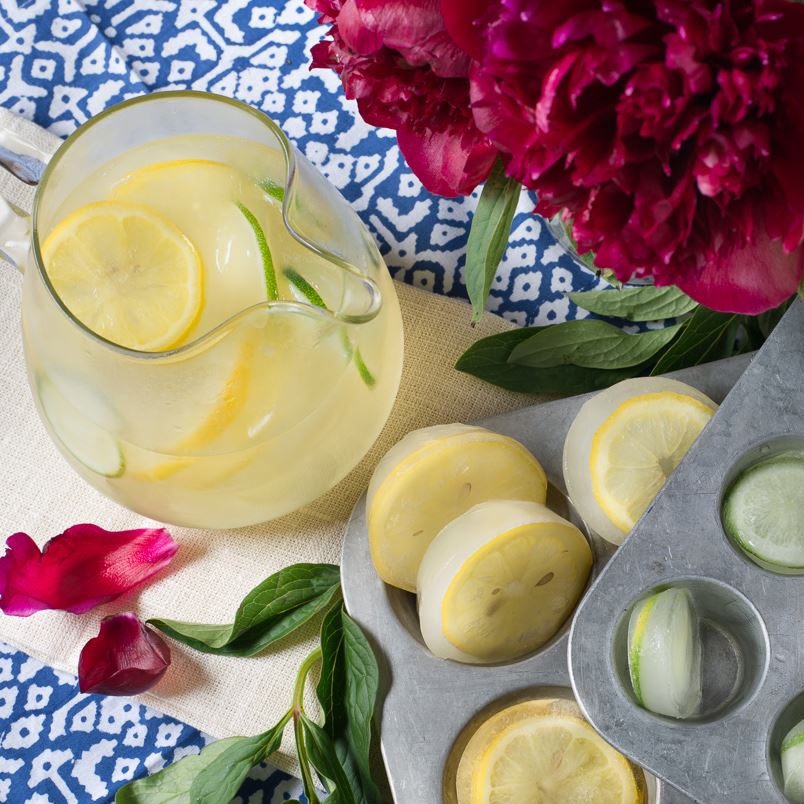
11.  Ice Cubes in a pinch, filled with fruit. - www.laughingcow.com

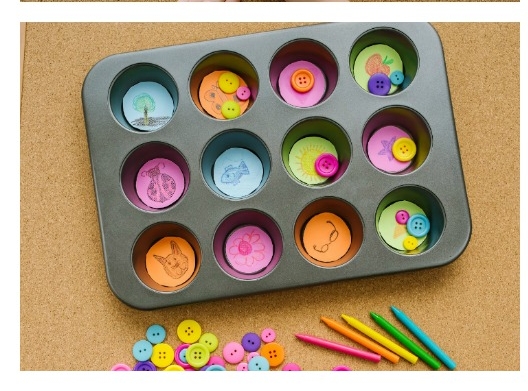
12.  Counting games- www.growingbookbybook.com

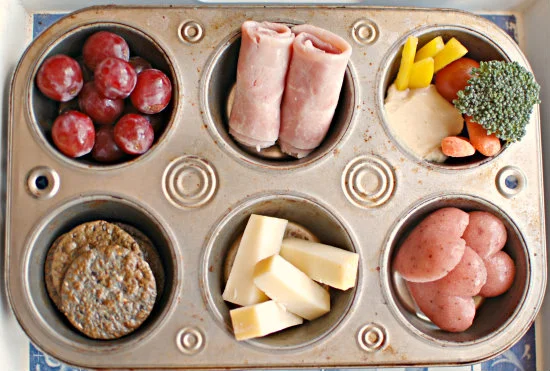
13.  Meal tray for children - www.yankeehomestead.com

14.  Home Decor- fill with family photos and hang-  www.simplestories.typepad.com

15.  Organizer for cupcake, cake, or ice cream toppings- www.catchmyparty.com

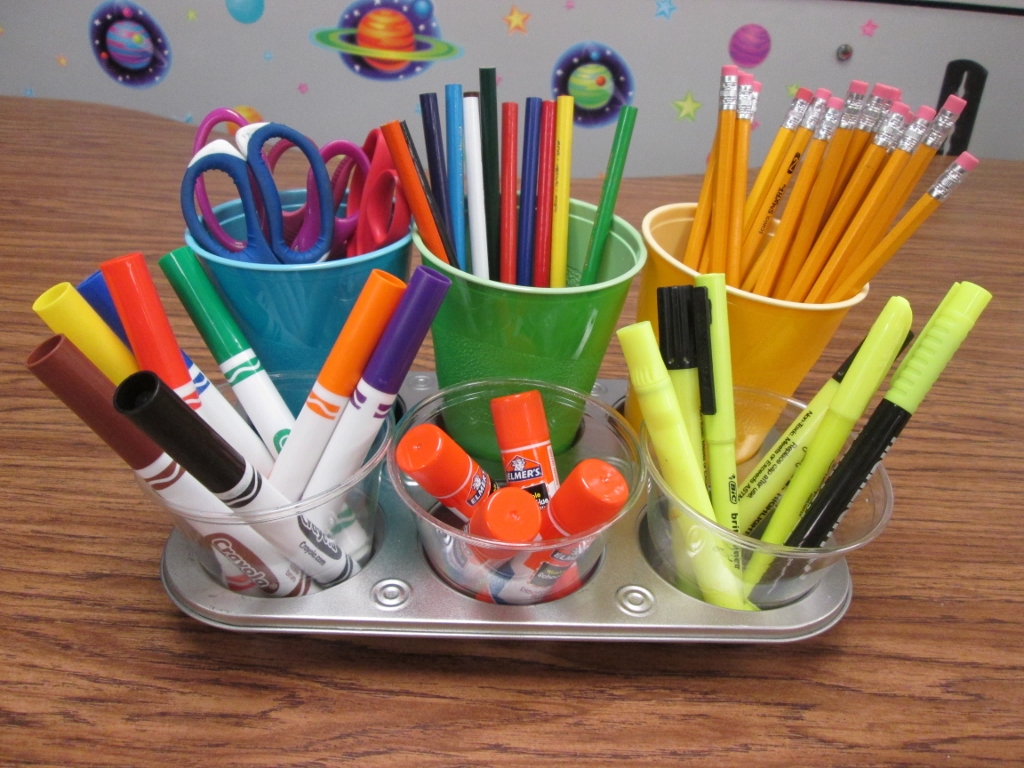
16.  School supplies organizer- www.scholastic.com

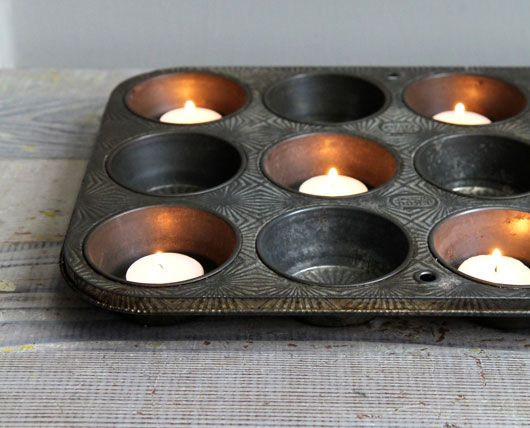
17.  rustic votive candle holder-www.onecrazyhouse.com

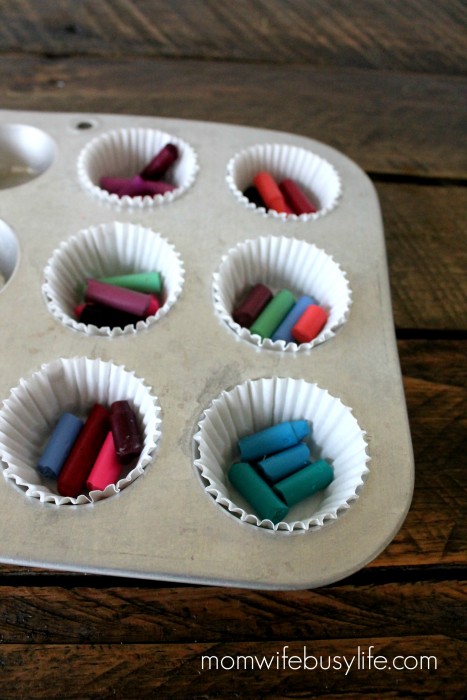
18.  Make new crayons using old crayons- Bake in a 350 degree oven until crayons are melted. -www.momwifebusylife.com

19.  Cup holder for the car- www.m.atchuup.com

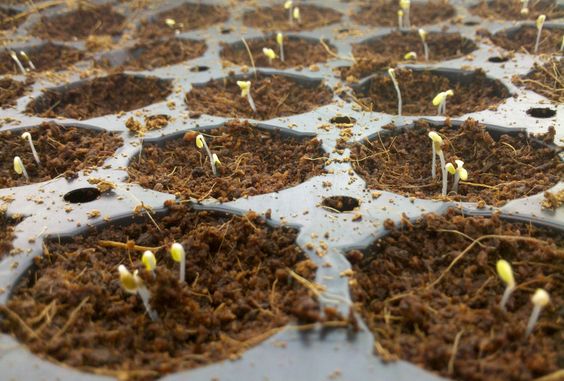
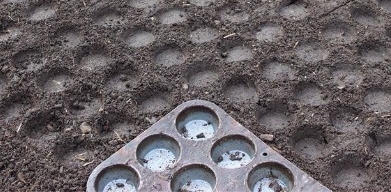
20.  seed starter- www.thegardenglove.com

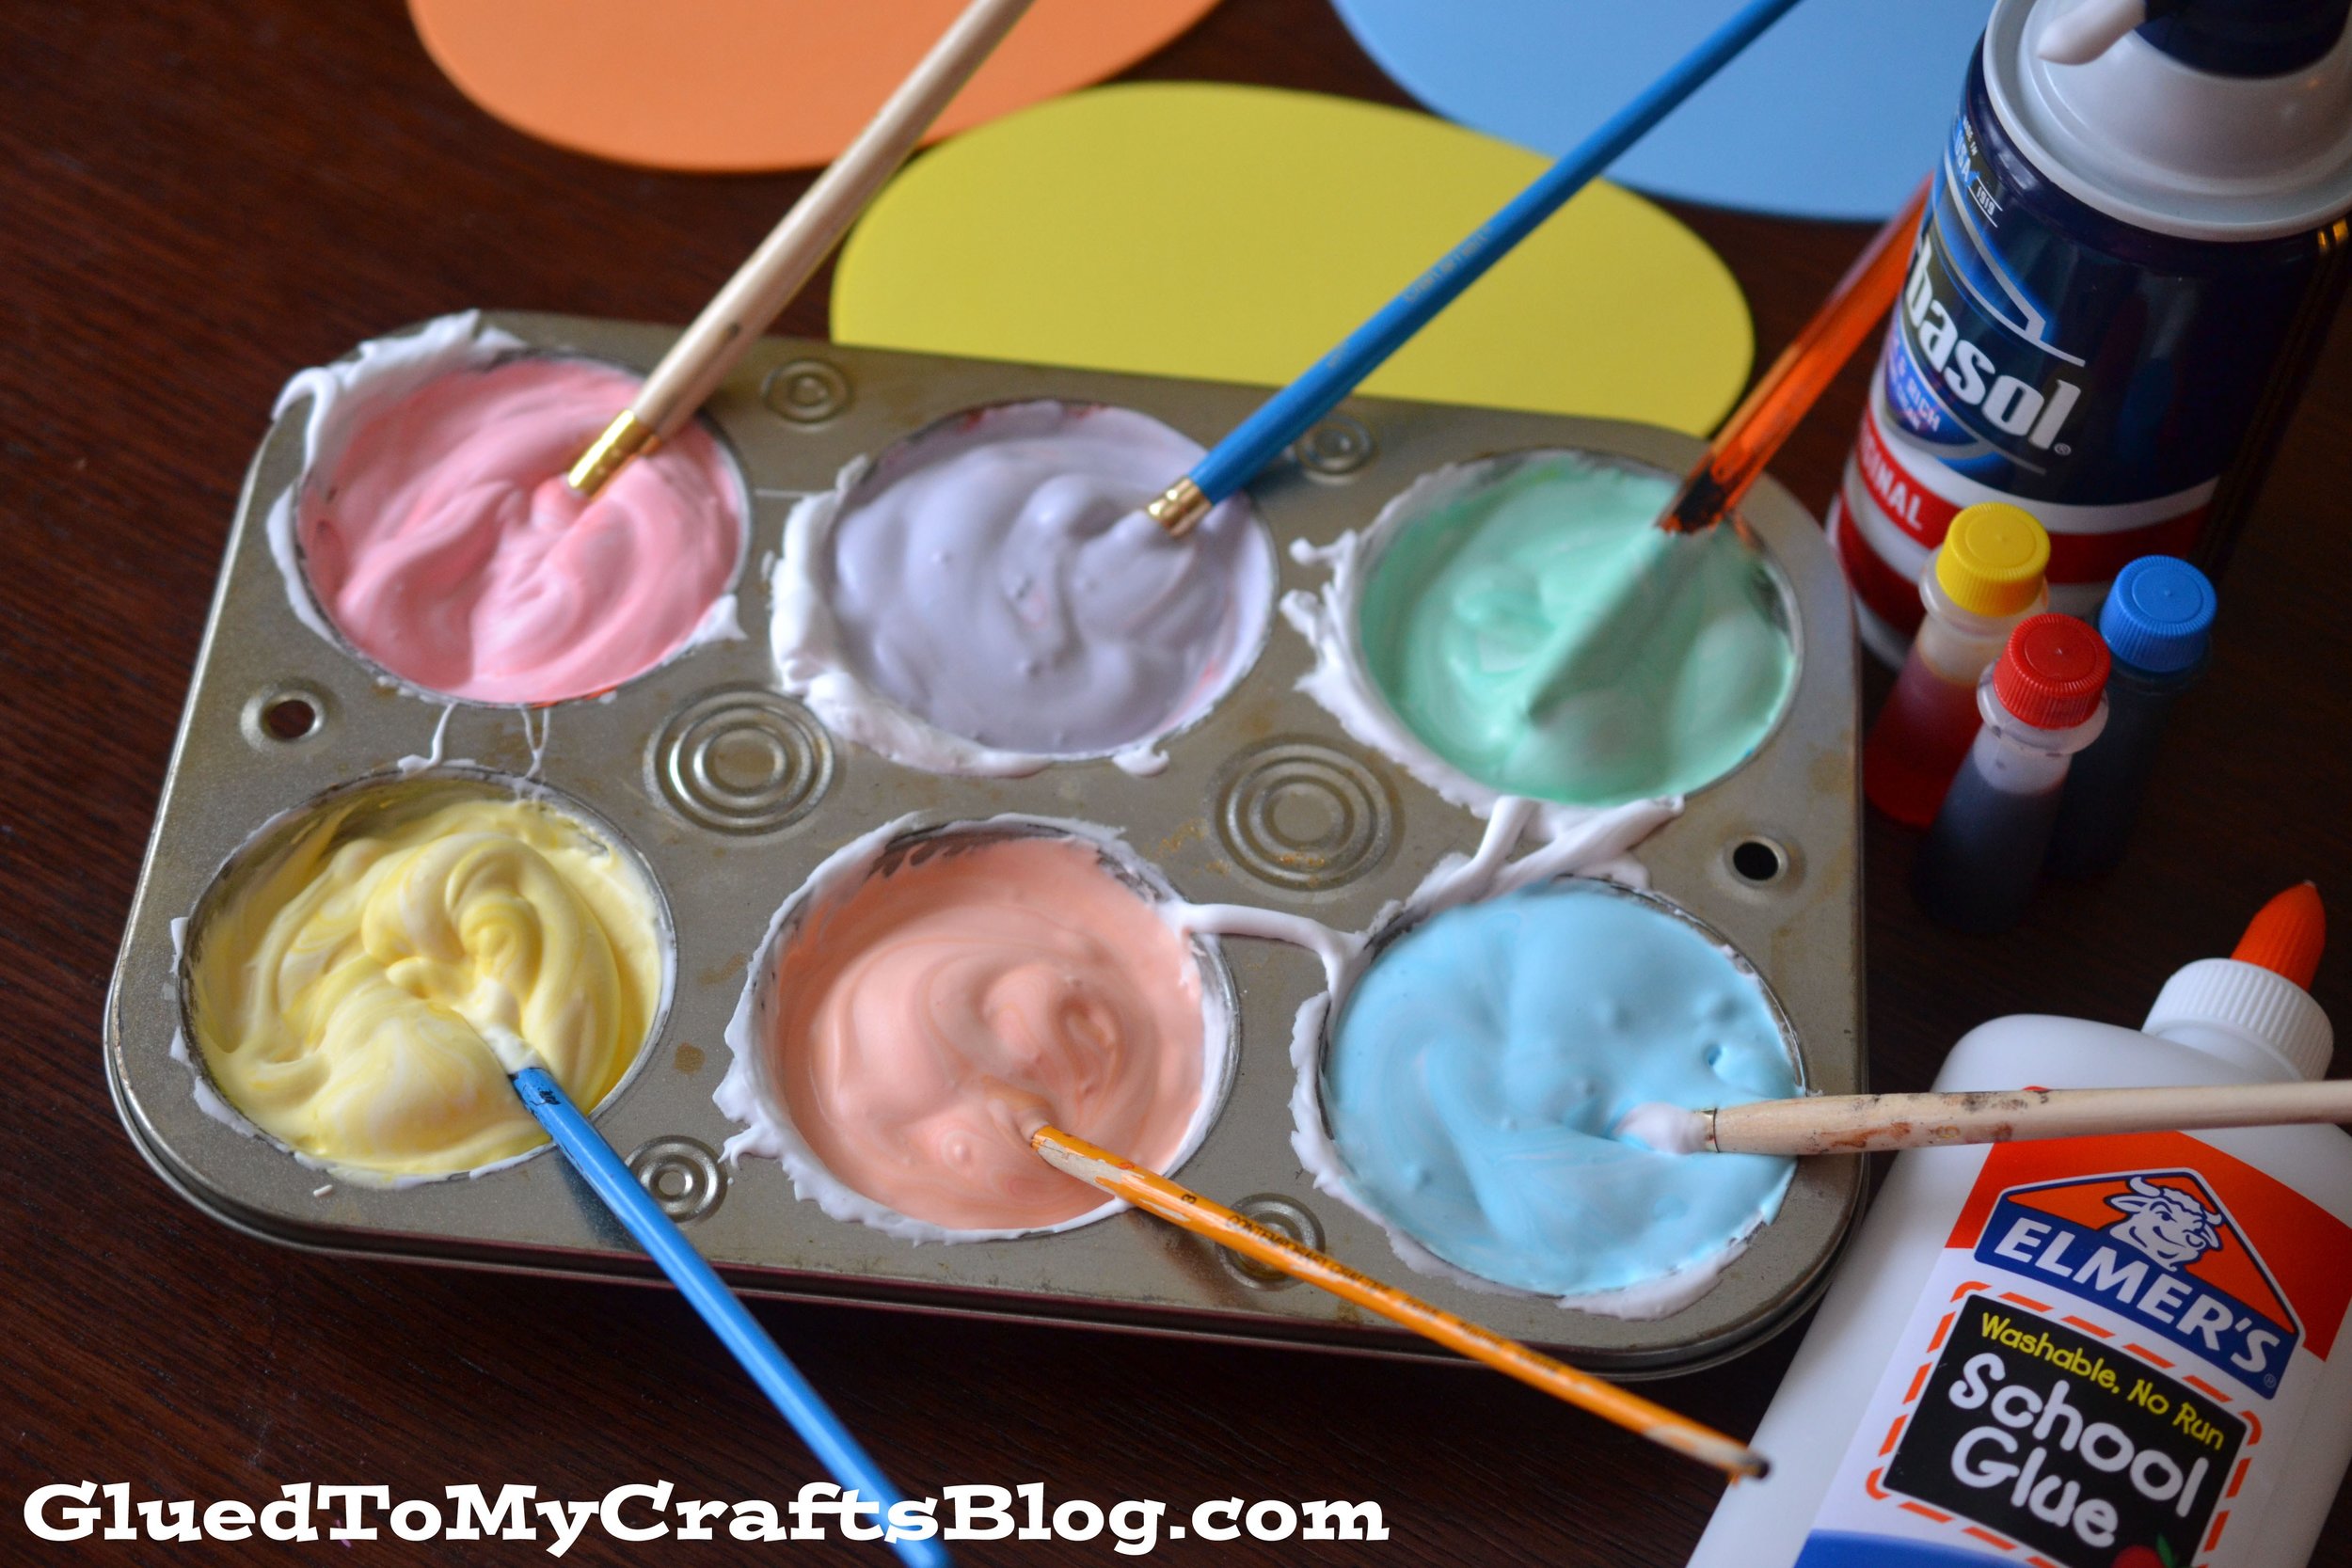
21.  Craft paint organizer- www.GluedToMyCraftsBlog.com

22.  Freeze leftover pesto or tomato paste-   www.littlethings.com

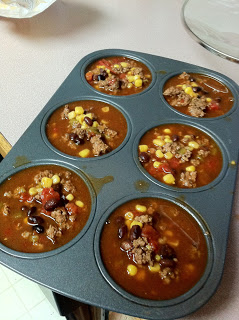
23.  Freeze individual portions of soup- www.crystalcattle.blogspot.com

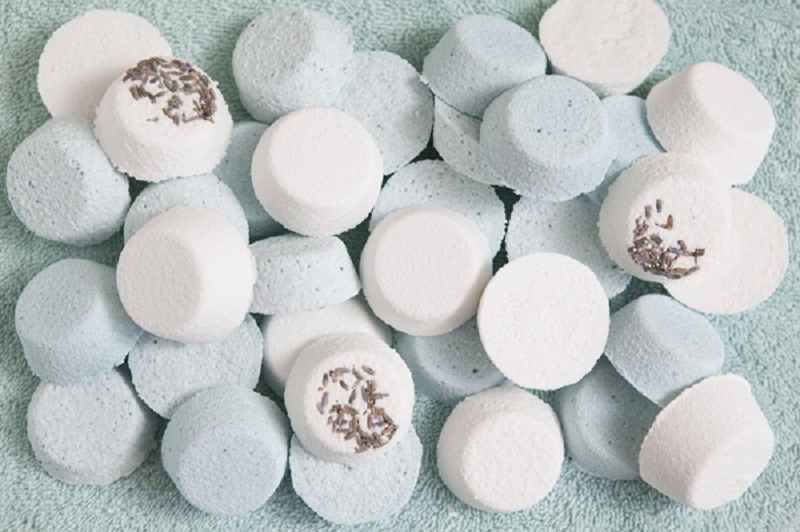
24.   DIT bath bombs molds- www.babble.com

25.  Seed Spacer-www.athriftymom.com

26.  Ok, one more...bonus! Taco stand- www.foodnetwork.com


Yum

Cooking Tip: How To Use Fruit Butters- 20 Ways

cooking tipsSheri SpalloneComment

Cooking Tip:  How To Use Fruit Butters- 20 Ways

Originally posted in 2016, but updated with new content.

Happy Fall, everyone! Fall has officially arrived, meaning it's prime time to enjoy all things apples, particularly apple butter (or any fruit butter, for that matter). We love fruit butters! We love them so much that we wanted to share twenty of our favorite uses for them in the kitchen this Fall and year-round.   

So, what the heck are fruit butters anyway?  Neither a preserve nor a jam, fruit butters are a class all their own, mixed with spices and slow-cooked to a thick, "butter-like" consistency. There is no dairy, as the name would suggest. Most are familiar with the famous Apple butter, but what about other fruit butter, such as Cherry or Strawberry Butter? Did you know that most fruits can be made into fruit butter spreads?  

So, fruit butters are more than just a spread for toast?  Correct! The uses are endless, and to celebrate Fall and because we love you, here are 20 of our favorite ways to use fruit butters! What's your favorite way to serve fruit butter?  Comment below.

Thank you for visiting! Come back again for more family-tested recipesentertaining ideas, and cooking tips using all our favorite Cherchies® gourmet products.

Follow us on social media: FacebookInstagram, and Pinterest.

  1. Use in recipes in lieu of sugar in an apple crisp or applesauce.

  2. Mix 1 part butter spread to 1 part maple syrup for French toast and pancakes.

  3. Mix it into roasted or baked sweet potatoes.

  4. Use butter spreads and pecans as a crepe filling.

  5. Spread it on toast or English muffins instead of jelly.

  6. Add to oatmeal (See our Apple Butter Oatmeal Recipe)

  7. Mix with cream cheese and spread on bagels.

  8. As a side dish with any pork dish.

  9. Heated and placed on top of ice cream (Apple Butter a La Mode Recipe)

  10. Mix with oil, vinegar, salt, and pepper to make a vinaigrette.

  11. Mix with wine and Cherchies® Champagne Mustard for a delicious glaze on pork or chicken.

  12. Spread on melted baked brie fresh from the oven. Serve with Cherchies® Champagne Mustard.

  13. Mix it with plain yogurt or cottage cheese like the Pennsylvania Dutch prefer.

  14. Great with turkey or chicken sandwiches. Mayonnaise on one side, apple butter on the other (Check out our Apple Butter and Egg Croissant Sandwich)

  15. Spread on a melted cheese sandwich.

  16. Make parfaits!

  17. Mix with yogurt and fruit and place in the freezer to make frozen yogurt-fruit popsicles.

  18. Add several tablespoons to a can of baked beans (hot sauce optional).

  19. Mix with fruit and spoon into a pie shell for a delightful fruit tart.

  20. A natural filling for Homemade Toaster Strudels.

Yum

Cooking Tip: How To Make French Bread Pizzas

cooking tipsSheri SpalloneComment

Cooking Tip:  How To Make French Bread Pizzas

Cook Time:  10 minutes  Difficulty:  Easy.

I love quick and easy recipes, and French Bread Pizzas are not only perfect for those busy nights, but they're also an excellent means for hiding leftovers...such as veggies:). If you have been following our blog (thank you), you will know that I am notorious for turning last night's leftovers into tonight's masterpiece...mainly out of necessity from picky kiddos.

We go through a lot of food!  With a family of five (one 21 year old boy, a 15 year old boy, a 12 year old girl AND their friends and my hubby and me), French Bread pizzas are a perfect way to stretch the buck and clear out the refrigerator at the same time;)

The pizza combinations are endless and every time I make them, the leftovers completely disappear.  My family, didn't even know what hit them:) "Mom, these are awesome!"  A moment of silence please...

Occasionally, I will place a bunch of toppings out and allow my family to create their own masterpieces for make-your-own pizza night.  It's a great way to get them involved in the kitchen and to catch up.  (However, when they make their own pizzas, guess what's leftover??  Veggies;)  The pizzas I created are listed below, Chicken Parmesan Pizza, Chicken Cordon Bleu Pizza, and Chicken Taco Pizza.  I'll post the recipes of all our concoctions in a future blog post.

How to Make French Bread Pizzas-  Here's how it's done...Have fun!

  • Start with a loaf of French Bread (or any kind of bread for that matter).  Cut the bread in half lengthwise.  (I usually cut in half lengthwise, then cut those halves in half).
  • Spread on your favorite sauce.  So many options...spaghetti sauce, salsa, olive oil and garlic, alfredo sauce, pesto, whatever you have in your pantry or leftover in your refrigerator.  Below we've featured spaghetti sauce Champagne Mustard, and salsa as the bases.
  • Next, add the toppings by using leftovers such as meat, vegetables, beans...the sky's the limit friends.  Below, we used leftover grilled chicken three ways, Chicken Parmesan Pizza,  Chicken Cordon Bleu Pizza, and Chicken Taco Pizza (Ingredients listed below).
  • When you are satisfied with your creation, add the seasonings and cheese. The Chicken Parmesan Pizza had a combination of shredded Parmesan and Mozzarella Cheese sprinkled with Cherchies® Garlic Seasoning, whereas the Chicken Cordon Bleu Pizza had Swiss cheese as the cheese of choice, also sprinkled with Cherchies® Garlic Seasoning, and finally, a shredded Mexican Blend and Mozzarella cheese were used for the Chicken Taco Pizza.  Easy Peasy!
  • Drizzle a little olive oil over the entire pizza and bake at 350 degrees until the cheese is gooey and melted.  Check out the ingredients for the three pizzas mentioned earlier.  Enjoy!

Chicken Parmesan French Bread Pizza-  Spread the bread halves with spaghetti sauce.  Sprinkle with cooked chicken, chopped basil, Cherchies® Garlic Seasoning, and a mixture of shredded Parmesan and Mozzarella cheeses.  Sprinkle with oregano and drizzle with olive oil.  Bake at 350 degrees until melty.

Chicken Cordon Bleu Pizza - Spread the bread halves with Cherchies® Champagne Mustard then spaghetti sauce.  Add chicken, ham chunks, swiss cheese and mozzarella.  Sprinkle with Cherchies® Garlic Seasoning and a little bit of dried Thyme. Drizzle with olive oil.  Bake at 350 degrees until melty.

Chicken Taco Pizza - Spread the bread halves with salsa seasoning.  Add chicken, black beans, Terrapin Ridge Farms Chipotle Aioli Sauce, and a blend of Mexican cheese blend and mozzarella.  Drizzle with olive oil.  Bake at 350 degrees until melty.

Yum

Cooking Tip: How To Revive Wilted Lettuce

cooking tipsSheri SpalloneComment
Cooking Tip- How To Revive Wilted Lettuce

Cooking Tip- How To Revive Wilted Lettuce

Poor sad wilted lettuce, it didn't ask for this!  I hate wasting food, don't you?  I picked up a glorious head of lettuce two days ago, forgot about it, and when I returned to fulfill my salad quest, the lettuce looked at me and begged, "Please make me pretty again."  

My friends, not all is lost (except for the fact my lettuce is talking to me...that's creepy;)  There is a simple solution to reviving most greens on a "stalk", such as lettuce, kale, celery, broccoli, swiss chard, etc.  Water!

Simply place your wilted greens in a large bowl, add water, ice, and allow the lettuce to chill in the refrigerator for a couple of hours.  I've read that some add lemon juice, but I don't feel that is necessary.  This system has always worked for me, and "if it's not broke, don't fix it", right?

After a couple of hours, remove your lettuce from the bowl, lay it out on paper towels, and gently roll up the paper towel with the lettuce.  Place the lettuce in a resealable bag and place back in the refrigerator.  Your lettuce should remain "pretty" for a couple more days.  *Note: This method does not work well for those boxed mixed greens.

So now you have the tools to revive your wilted greens when they start talking to you.  Ha!

Yum